Frequently Asked Questions
1. When will my order ship?
The short answer is that it'll ship when it is finished.... If you are not prepared to wait a couple of weeks then don't order from me. Look for one on the used market if you need it immediately.
Swindler is a ONE man operation run by me (Drew Swindle). I do this on the side. I have a full time job. I have other responsibilities. And I have very limited time to build each week.
I build each pedal per order as they are received, in the order they are received. Just because something is listed as "IN STOCK" on the website does NOT mean that it is sitting on a shelf waiting to go out. Since starting Swindler (fully) in 2015, that has rarely ever been the case. Items listed as "IN STOCK" just indicate that they are available to order and are currently being produced.
If you send me an email asking when your pedal will ship I will simply direct you back to this FAQ page. I don't mean to be harsh or rude. I just get very weary of fielding questions like this as people tend to have the perception that Swindler is a larger operation than it really is. Which can put unrealistic expectations on me and make things discouraging at times.
If you ordered something, I promise I am working on it, and I'll get it out as soon as I can. But this is a small business in the truest sense of the word.
2. What size are your pedals?
Dimensions are listed on each individual product page and also below for convenience.
The majority of our pedals utilize the popular Hammond 125B enclosure.
Dimensions: 4.7 x 2.6" x 1.5"
The Nexus_4 utilizes a slightly different Hammond 1550D enclosure.
Dimensions: 4.51" x 2.52" x 2.17"
Keep in mind - things like 1/4" jacks, power jacks, and side switches will stick out an additional small amount.
3. What is the current draw of X pedal?
The current draw for each pedal is listed at the bottom of each product page in the web store.
You can also find this information in the user manual for each pedal. Available for download HERE.
You can also find this information in the user manual for each pedal. Available for download HERE.
4. Can you explain the "version" numbers when it comes to your documentation (Ver X)? How do I know which manual to get?
So there are a couple of things to think about in order to download the correct manual for your exact pedal to ensure you are using it correctly. I will try to explain everything in detail here.
It starts with what hardware version pedal you have. See the other FAQ for details on determining that...
If your pedal is an older V1 hardware pedal, then you will find those manual downloads in the "Original V1 Hardware Manuals" section on the LEGACY DOCUMENTATION PAGE.
If your pedal is a current V2 hardware pedal, then the next question is what FIRMWARE is your pedal CURRENTLY running?
For the WORKERS COMP, IRON DRIVE, MINESHAFT, and MAGIC CITY, there is only one manual. Since those pedals are not capable of firmware updates or MIDI. These can be found in the "Pedal Manuals" section of the main DOCUMENTATION PAGE.
For the RED MOUNTAIN, THE GULF, and NEXUS_4 (coming soon), you must also determine what firmware version you are currently running to ensure you download the correct manual. This is usually done by holding the far RIGHT footswitch for around 5 seconds while you apply power to the pedal. Keep holding the footswitch until lights start to blink. The number of times the light blinks will signify the current firmware running. This blinking will occur in a delayed, repeating pattern as long as you continue to hold the footswitch. In case you missed it the first time.
For example: if the light blinks 2 times, then you are running firmware Ver 2 and should download the "Ver 2" manual. If the light blinks 3 times, then you are running firmware Ver 3 and should download the "Ver 3" manual.
The latest and greatest manual for each pedal can be found on the main DOCUMENTATION PAGE. If you are running an older firmware version, these can be found in the "Previous V2 Hardware Manuals" section on the LEGACY DOCUMENTATION PAGE.
5. I'm looking at buying a used Swindler pedal. How do I know what version it is?
It's true. We've gone through a few upgrades over the years in our continued efforts to improve and make our products better and better. But figuring out what pedal you're looking at just from the outside is easy to do if you know what to look for.
If your pedal resembles our standard line of graphics, then you'll have to look closer at the details.
NOTE: We are working on getting updated product page pictures for all V2 pedals. The pictures in the online store are technically of V1 pedals. Don't be alarmed. All pedals sold through our store will be current V2 products.
There are few other things you can look out for that *could* point you in the right direction but they are less guaranteed. So proceed with caution.
If you are ever in doubt, please reach out to us and we can help you identify anything no problem.
- Does your pedal have graphics on it? Do any of the graphics look similar to the ones on the LEGACY PRODUCTS page? If so, then you have a V1 hardware pedal. Easy!
- If the graphics don't resemble the pedals on the LEGACY PRODUCTS page at all, then congratulations! You have one of our limited edition designs. These should all be V2 hardware, but you can continue reading below to be sure.
If your pedal resembles our standard line of graphics, then you'll have to look closer at the details.
NOTE: We are working on getting updated product page pictures for all V2 pedals. The pictures in the online store are technically of V1 pedals. Don't be alarmed. All pedals sold through our store will be current V2 products.
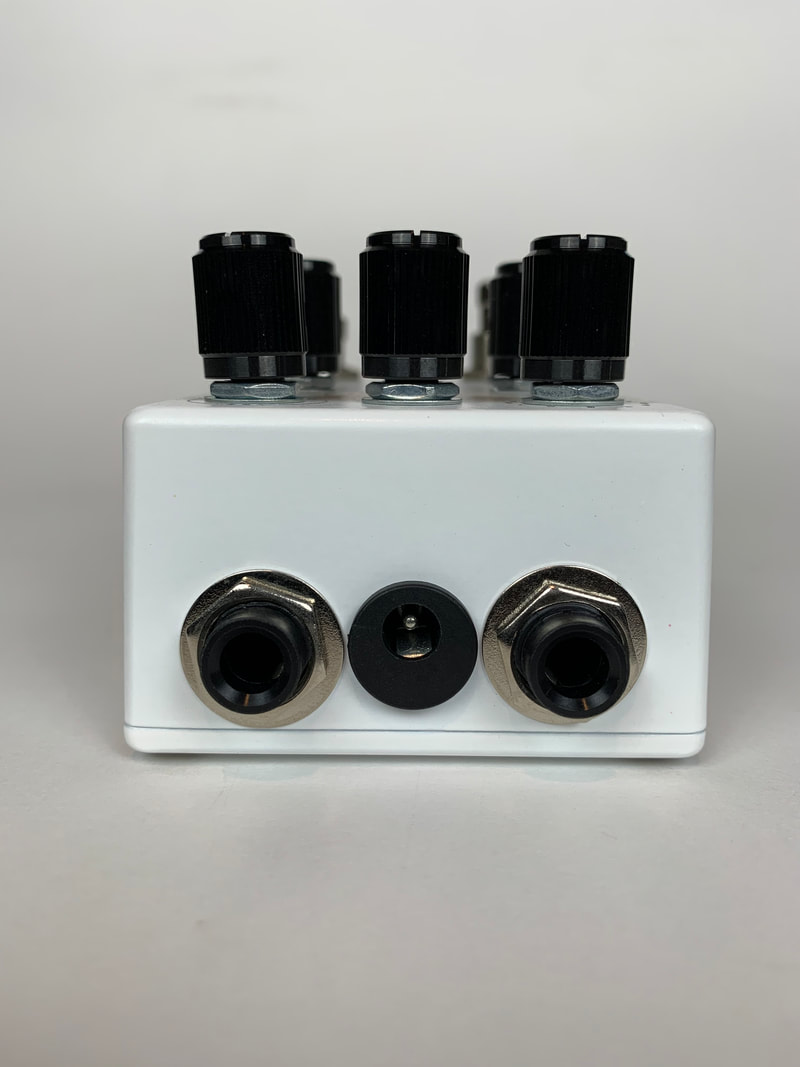
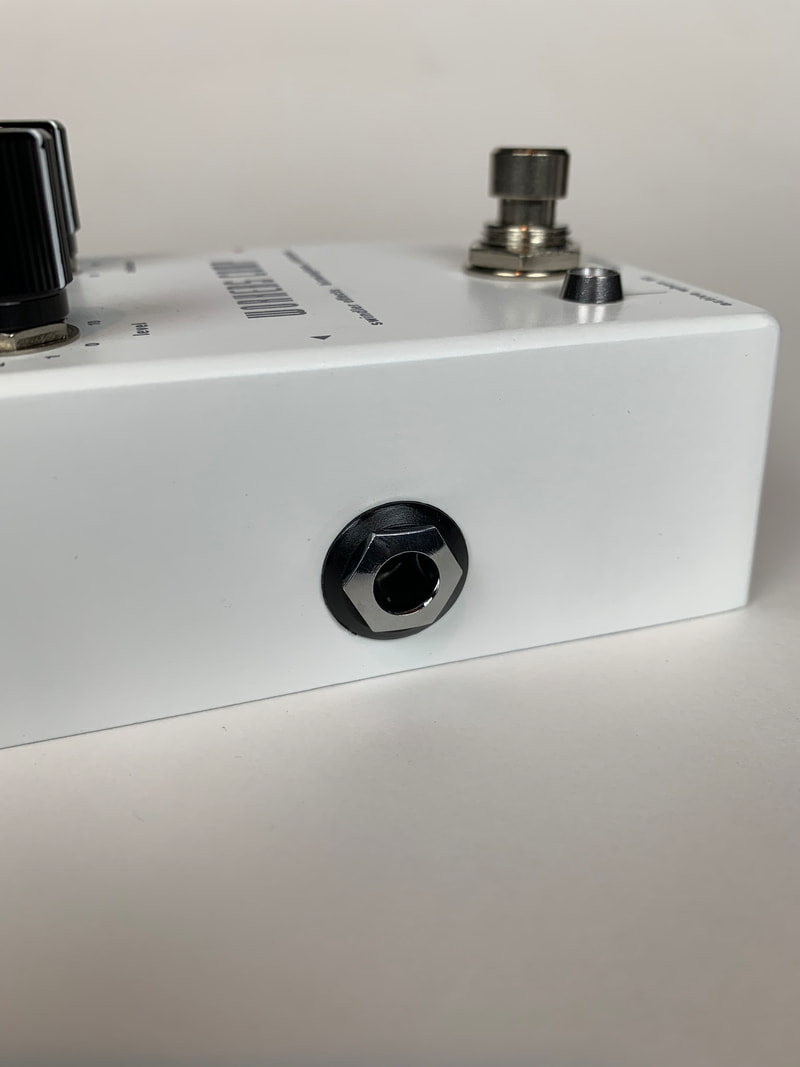
- For the WORKERS COMP, IRON DRIVE, MINESHAFT, and MAGIC CITY, the easiest way to tell a V2 apart from a V1 is the 1/4" audio jacks. See the pictures below. The V2 hardware pedals use PCB mount jacks that have a slimmer profile from the outside along with a black plastic bezel. The V1 pedals use a full metal open jack with a full metal nose, nut, and washer on the outside. One other thing to note on the MINESHAFT. From V1 to V2, the audio jacks moved from the top to the sides.
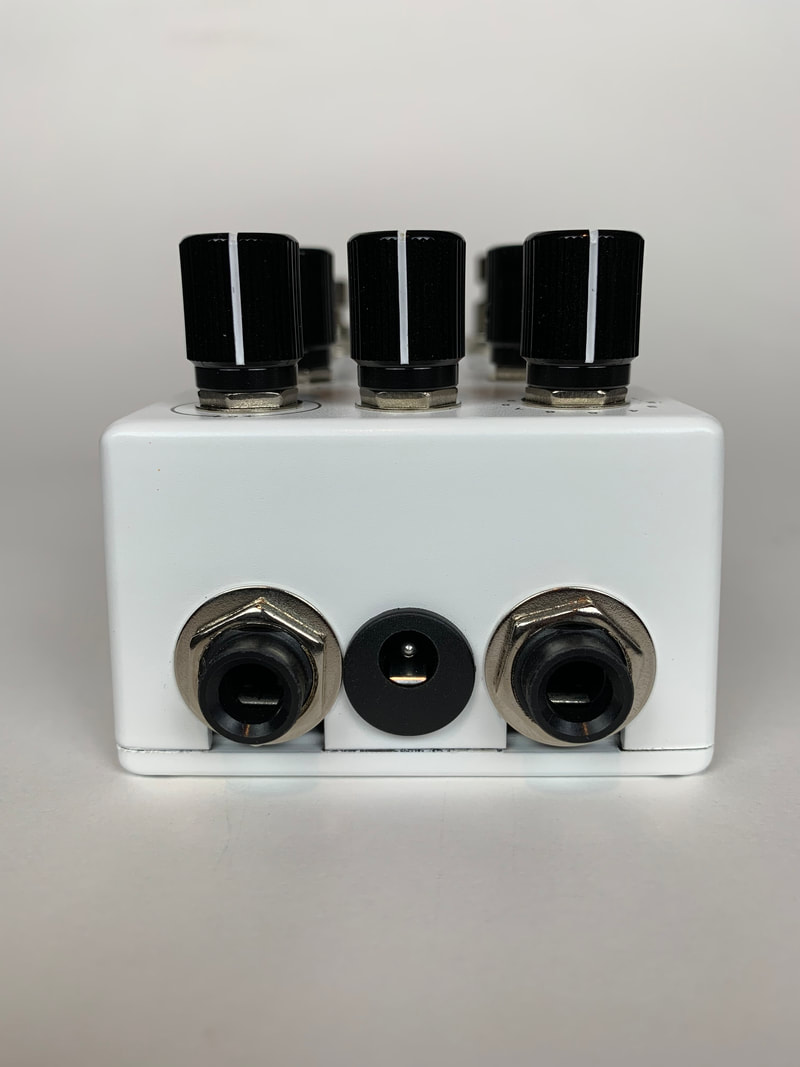
- For the RED MOUNTAIN and THE GULF, the only way to tell a V2 from the outside 100% of the time is to look at the top edge where the power and 2 additional 1/4" jacks are. On V1 pedals, these 1/4" jacks are installed in standard holes that you can't see due to the washer. On V2 pedals, in order to assemble them with the new circuit layout, these 1/4" jacks are installed in slotted holes that open up towards the back of the pedal. See pictures below for details.
There are few other things you can look out for that *could* point you in the right direction but they are less guaranteed. So proceed with caution.
- Knobs - we standardized on a different knob for ALL V2 pedals (except for maybe some limited editions). These are flatter on top with a larger indicator line that also extends down the side. ALL V2 pedals have these knobs, but there may be a small set of V1 pedals that have them as well as we were making the switch. See pictures below.
- Footswitches - same as above with the knobs. If the footswitches have more of a flatter top then it's most likely a V2 pedal. But there may be a small set of V1 pedals with these as well as we were making the switch towards the end. Most V1 pedals have footswitches with a more rounded top. See pictures below.
If you are ever in doubt, please reach out to us and we can help you identify anything no problem.
|
|


6. Why do some of your pedals take a few seconds to power on.
Some of these delays are by design and some are not (depending on your power supply. See farther below on that).
Important Note Regarding Strymon Power Supply Units (PSUs):
There is a known "issue" with the Strymon power supplies (Zuma, Ojai, etc) regarding a power up lag or delay. This is due to how the Strymon PSUs are designed and was confirmed with Strymon Tech Support.
If you plug a pedal into a Strymon PSU DC output while the PSU is currently ON. Then the voltage of the DC output will slowly increase from 0 to 9V. This will appear like a power up delay and nothing is happening on the pedal itself because many of our pedals won't even begin to power on until they see closer to 9V coming in. In this instance, you just have to wait for the voltage to rise high enough to power the pedal fully.
HOWEVER, if you have pedals plugged into the Strymon PSU DC outputs FIRST, and THEN apply power to the whole PSU at once. This output DC ramping does NOT occur, and everything will power up as quickly as normal. Like on any other PSU from Truetone, Voodoo Labs, Walrus, etc.
Please keep this power up delay in mind with some of our pedals. Especially ones that utilize configuration changes upon initial power up. To accomplish these configuration changes with Strymon PSUs, you will either need to remove and reapply power to the whole PSU when doing the configuration. Or continue to hold the required footswitch longer and delay executing the configuration steps until the DC outputs have reached their full output. Assuming, you are removing and reapplying power at the pedal itself (with the PSU running).
- For the WORKERS COMP, IRON DRIVE, MINESHAFT, and MAGIC CITY. The lights on these pedals will all blink 3 times upon power being applied, and should begin normal operation immediately.
- For the RED MOUNTAIN, and THE GULF. The lights on these pedals will blink upon power being applied (depending on the current configuration. See manual). Then there is about a 5 second delay (by design) before the pedal begins operation. This is there to ensure the program begins correctly and to give time for settings and voltages to initialize / stabilize. Don't be alarmed. This only happens when power is applied.
Important Note Regarding Strymon Power Supply Units (PSUs):
There is a known "issue" with the Strymon power supplies (Zuma, Ojai, etc) regarding a power up lag or delay. This is due to how the Strymon PSUs are designed and was confirmed with Strymon Tech Support.
If you plug a pedal into a Strymon PSU DC output while the PSU is currently ON. Then the voltage of the DC output will slowly increase from 0 to 9V. This will appear like a power up delay and nothing is happening on the pedal itself because many of our pedals won't even begin to power on until they see closer to 9V coming in. In this instance, you just have to wait for the voltage to rise high enough to power the pedal fully.
HOWEVER, if you have pedals plugged into the Strymon PSU DC outputs FIRST, and THEN apply power to the whole PSU at once. This output DC ramping does NOT occur, and everything will power up as quickly as normal. Like on any other PSU from Truetone, Voodoo Labs, Walrus, etc.
Please keep this power up delay in mind with some of our pedals. Especially ones that utilize configuration changes upon initial power up. To accomplish these configuration changes with Strymon PSUs, you will either need to remove and reapply power to the whole PSU when doing the configuration. Or continue to hold the required footswitch longer and delay executing the configuration steps until the DC outputs have reached their full output. Assuming, you are removing and reapplying power at the pedal itself (with the PSU running).
7. Do your pedals that have MIDI functionality work with the different MIDIBOX (DIN-5 to TRS) converters made by other manufacturers.
8. What MIDI Cables to you recommend?
MIDI Cables for use with Swindler products need to have a 1/4" TRS end.
- If you are controlling any Swindler products with a MIDI controller that has a standard DIN 5 MIDI jack then that's easy! I suggest getting one of the "5P-TRS PRO MIDI CABLES" from Disaster Area Designs. Click HERE. These are the ideal solution for a pedalboard given their space saving right angle connectors and they will work no problem.
- If you are controlling any Swindler products with a MIDI controller that already has 1/4" TRS MIDI outputs. Then you can use any standard 1/4" TRS cable. However...the controller needs to send the MIDI data in a particular way. Specifically, it needs to send MIDI data on the TIP of the TRS and pull the TRS RING HIGH up to power. This is per the recently released full MIDI Protocol Standard established by the MIDI Association. Any other wiring configurations set up to work with earlier proprietary setups (such as for Chase Bliss, Meris, Empress, etc) will NOT work. Swindler products expect to see the full fledged MIDI wiring, just over TRS instead.
*This page will continue to be updated periodically with any questions we get regularly.*